Making Math
          Visible

Four-Triangle Polylink


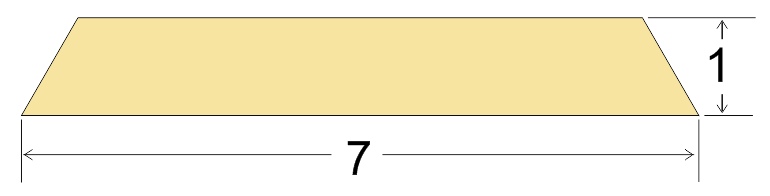
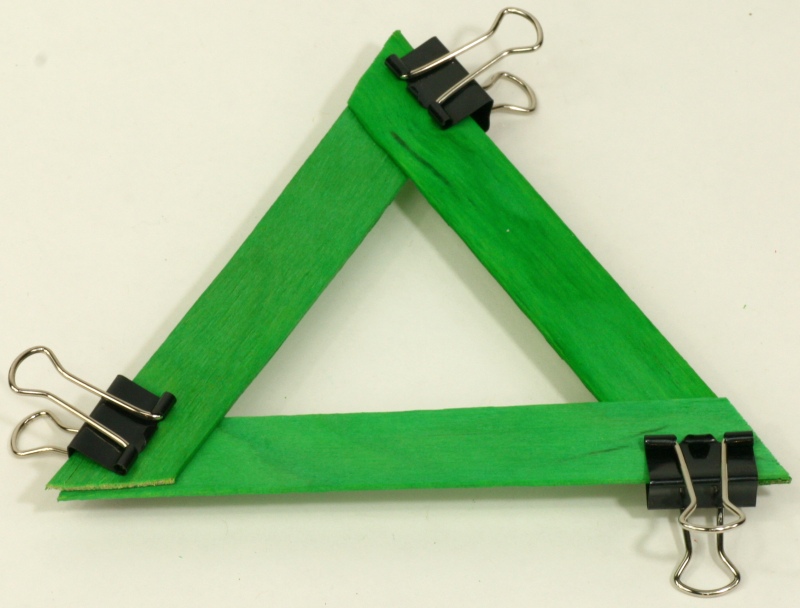
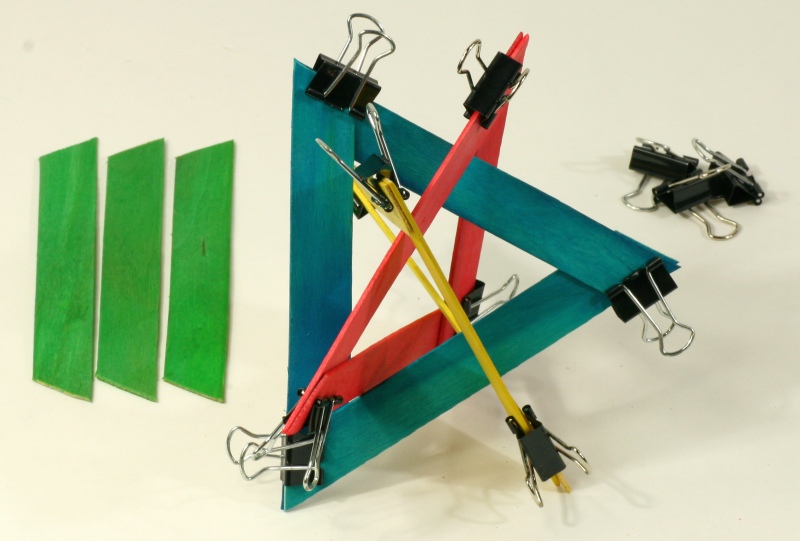
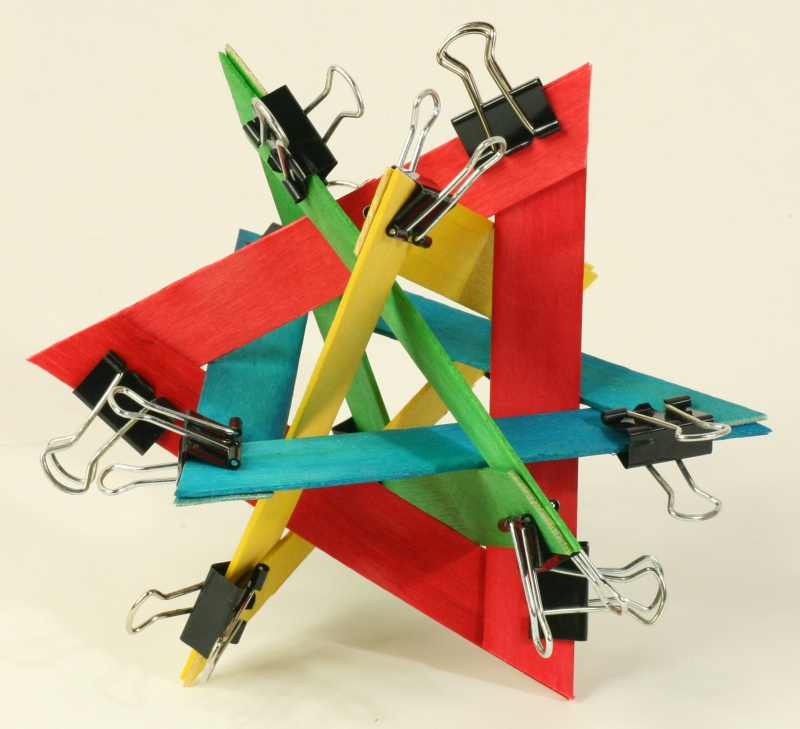
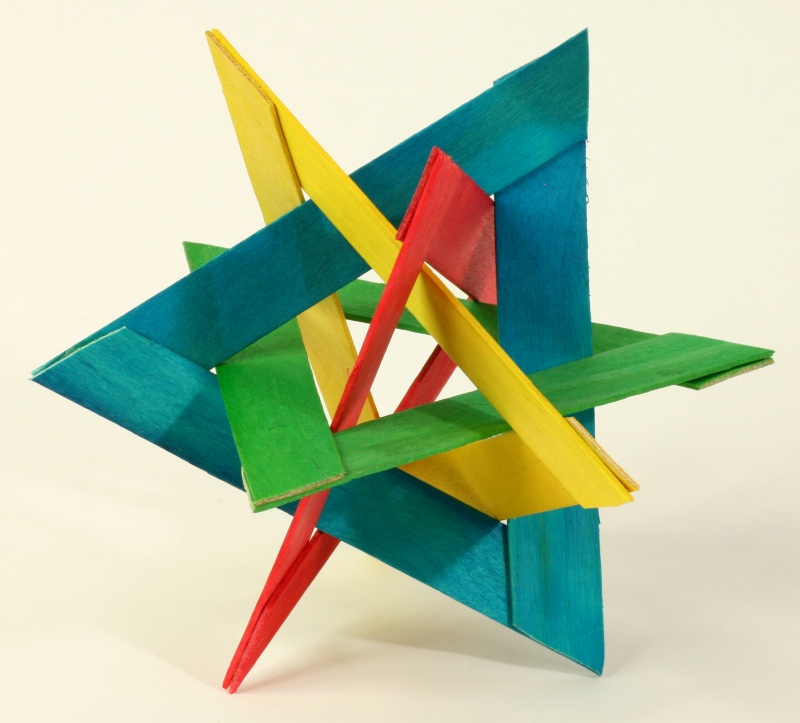
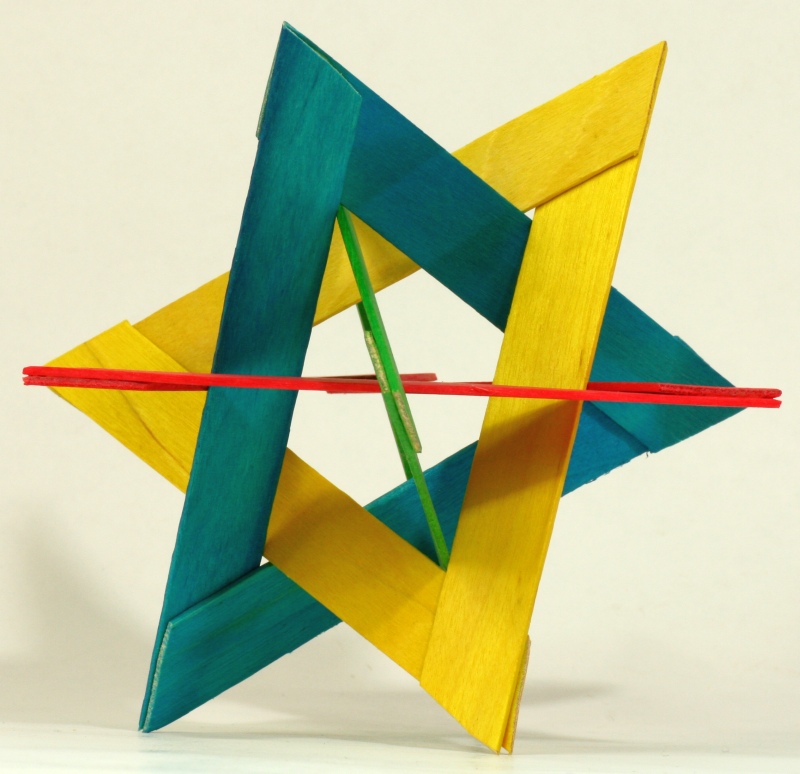
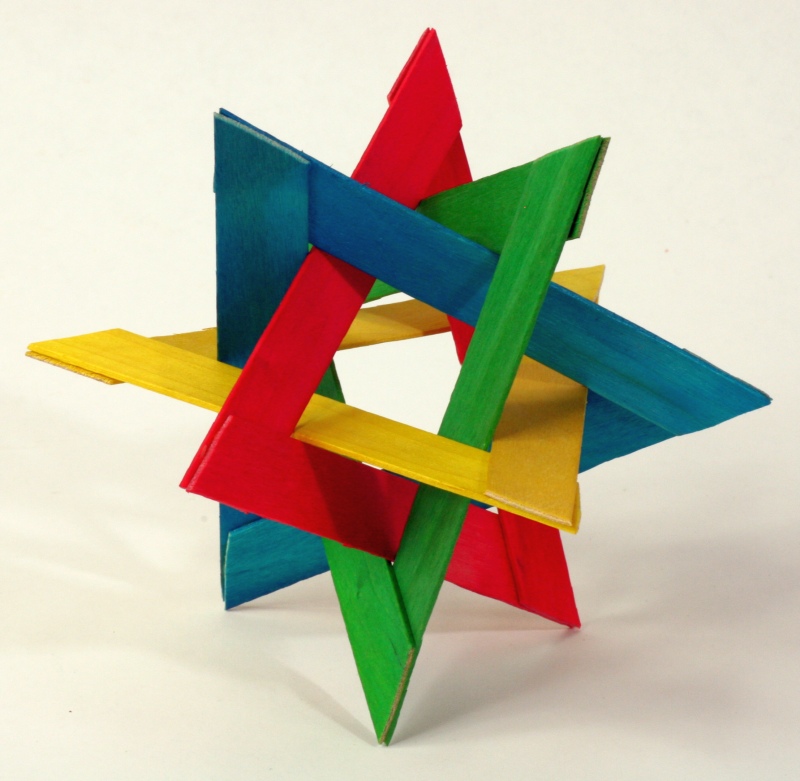
This symmetric arrangement of four hollow triangles was discovered around 1970 by the chemist Alan Holden. It is surprisingly simple, yet difficult at the same time.  
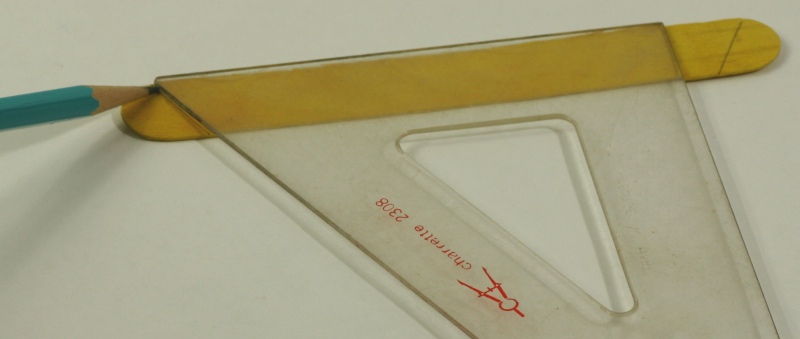
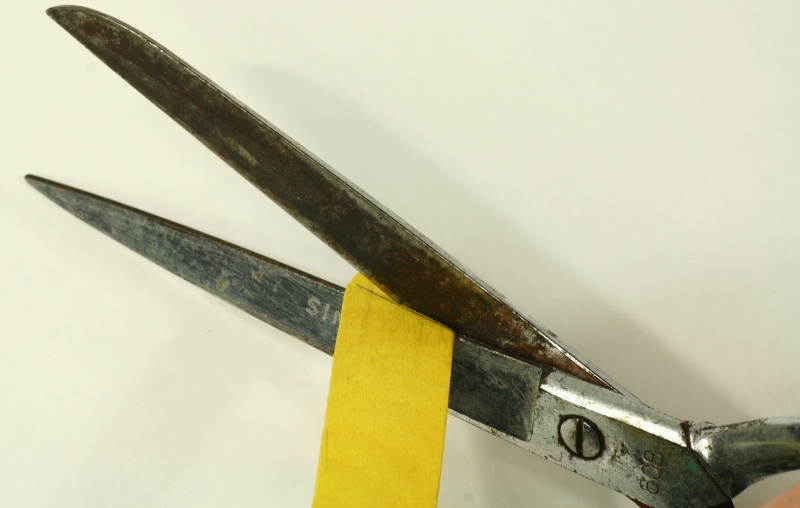
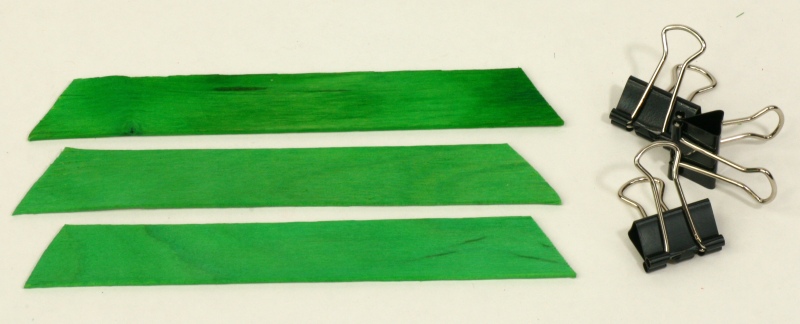
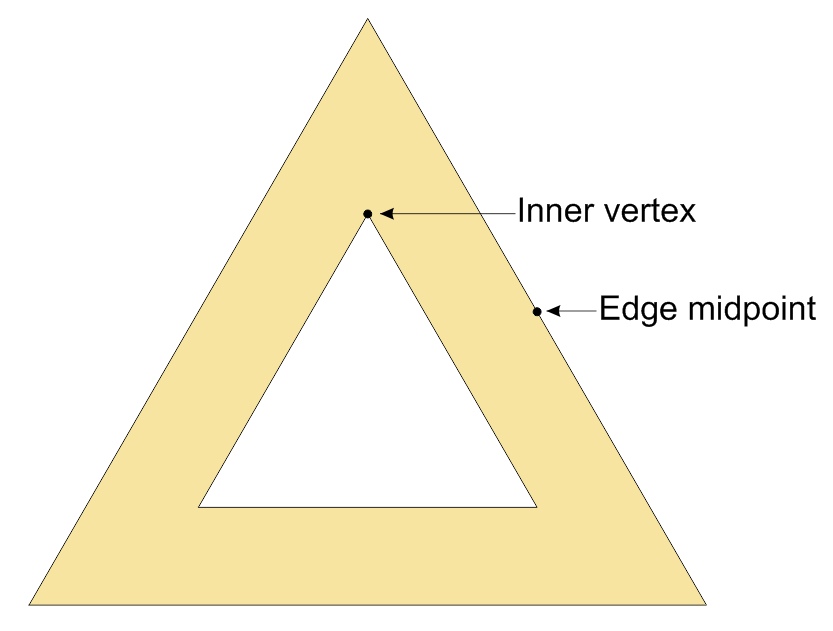
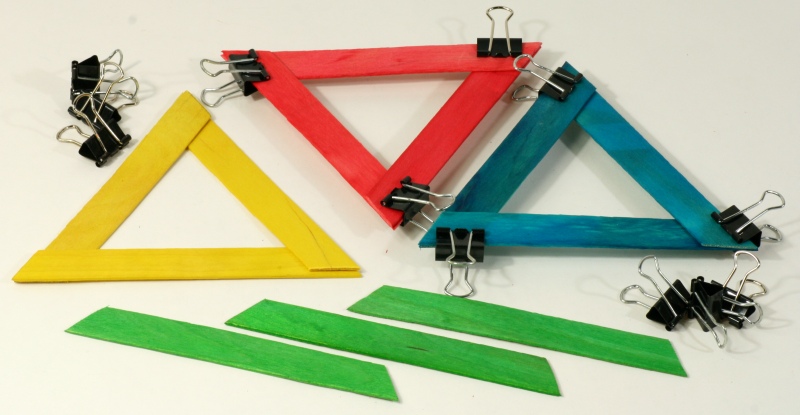
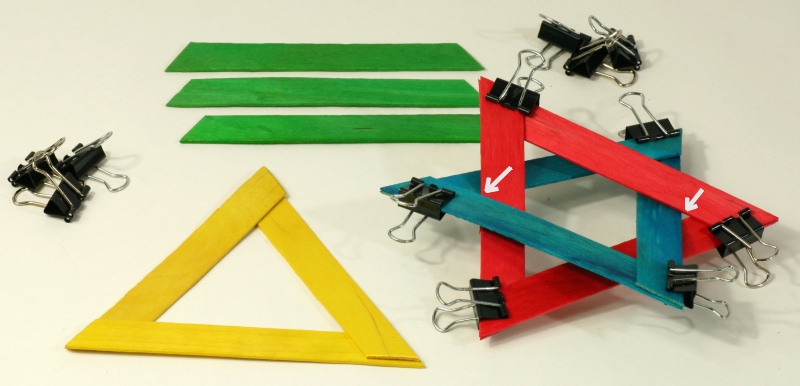
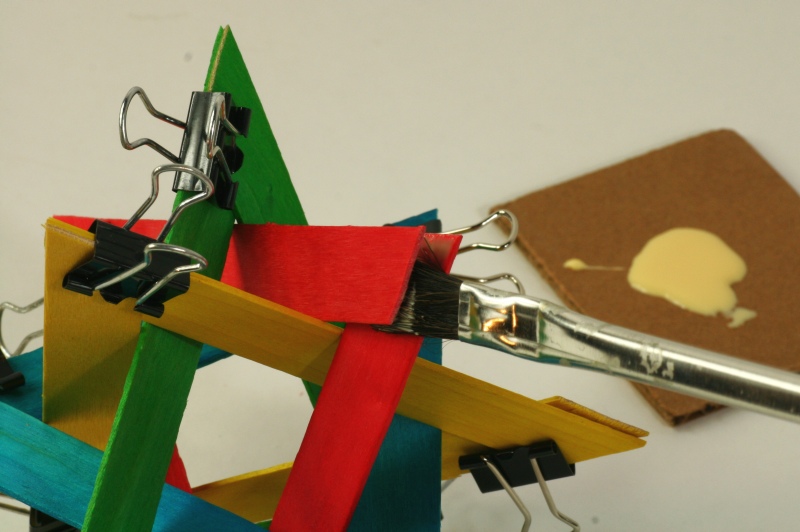
The goal of this workshop is for students to solve the problem of building their own copy of the structure using colored wood sticks.  Along the way, they will come to appreciate some of the beauty of the structure while learning that mathematics is a living subject with new discoveries continuing in the present. It is also great as a puzzle for developing both spatial reasoning ability and problem solving persistence.  Students will feel a great "Aha!" moment when they complete it.

Time Required: 45 Minutes


Materials:
 Notes:

1.  This is the first in a series of three polylink workshops.
2.  You can use uncolored sticks if necessary, but the result looks much better in four colors.
3.  With older students, you could have them mark and cut the ends of the sticks using scissors.  Here, we assume you will prepare the parts before the workshop.
4.  Working in groups of two is highly recommended.  Students will discover that having four hands is helpful when assembling the parts.


Preparation


1. The ratio of the length to the width of the sticks needs to be fairly close to 7:1 for a snug fit. We have found that different brands of craft sticks have somewhat different widths. Measure the width of your sticks.  Multiply by 7 to get the desired length.  (The U.S. "jumbo craft sticks" shown in these pictures are 1.8 cm wide, so should be cut to 12.6 cm in length.)


2. Mark the ends of the sticks at 60 degrees to form trapezoids of the desired length.  (Watch out you don't make a parallelogram!)  After you cut one master-stick, you can just trace its ends on to the others.


3. Cut the ends with strong scissors.  (Or a woodworker can cut a stack at a time with a saw.)


4. You need twelve cut sticks per group, three per color.


Part A. Minds-On


1. Remind students of the regular tetrahedron.  It is a polyhedron with four equilateral triangle faces.  It has four vertices and six edges.  Ask if they can imagine another simple, natural, symmetric, 3D structure made from four equilateral triangles.  They will quickly see that there is no other way to arrange four triangles as a polyhedron, so they need to look beyond the realm of polyhedra.  Discuss ideas that the students propose.  As an illustration, one possibility they should be able to visualize, shown above, is to remove four faces from a regular octahedron, leaving four corner-connected triangles, but that is not today's structure.  (This octahedron is red on the outside and yellow on the inside, so the image shows the inside of the two rear faces.) 

2. Tell students that there is an interesting solution, but even though it is made of just four triangles and is very symmetric, it is very difficult to visualize.  In fact, mathematicians have been thinking about the possible symmetric shapes made with equilateral triangles for over two thousand years, but no one conceived of the form we will make today until the 1970's. Emphasize that mathematics is very much an active, creative field, with new discoveries published every day. The challenge of this activity is for students to discover this (relatively) new structure, given a few hints.


3. Tell students they will be making the structure from trapezoid-shaped wooden sticks held together with small clamps (or clothespins).  Show them three of the sticks and three of the clamps and ask them to visualize how they can build a triangle.  They will see that three sticks can be overlapped at the ends to form a hollow triangle. Tell students that the hollowness is important, because in this structure, each triangle will pass through the hole of each of the other three triangles.


4. Point out that it will be helpful to have some vocabulary for talking about these hollow triangles.  There are three vertices and three edges around the outside, just as in any triangle.  But we also want to name the three corners of the hole, which we call inner vertices as indicated above.  In addition, we will find that the three points at the midpoints of the outer edges are very important for understanding and talking about this construction.  One of the three edge midpoints is indicated above.  Having names for all these points helps for keeping them in mind and when communicating with one's partner. 


Part B. Hands-On

1. Divide the class into groups of two.  Hand out twelve trapezoidal sticks (three in each of four different colors) and twelve clamps to each group. 


2. Ask each group to choose a color and make a triangle of that color by overlapping the ends of three sticks and applying three clamps.  With younger students, there may be some confusion about which way the sticks face.  See if they can articulate the observation that the longest edge goes on the outside.

3. Ask students to observe that if they want to be very symmetric, they can make every overlap in the same way, e.g., always placing the clockwise stick end over the counterclockwise one.  This is not crucial structurally, but it will look best if totally symmetric with every triangle made the same way "like a spiral".  Have each group choose one consistent handedness and rebuild their triangle if necessary.  By doing this, they are creating 3-fold rotational symmetry, which will be part of the overall symmetry of the final result.  With younger students, see if they can articulate the observation that one end of the stick is on top and the other end is on the bottom.  Remembering this is a good way to quickly notice if an errant stick has both ends on top or both ends on the bottom.

4. As a nice visualization problem, ask students to predict what their triangle will look like if they turned it over: Will the other side be the same handedness or the opposite handedness?  They may be surprised to discover that the other side is not the other handedness; both sides look the same.


5. Ask students to make a second triangle that spirals the same way.  They will naturally build it separately, as in the image above.


6. Tell students that in our construction any two triangles are linked like two links of a chain.  To link their two triangles, they can remove one clip, slide the other triangle through the little opening, and replace the clip.  The image above shows two triangles linked. 

7.  Remind students of the special points discussed earlier: the inner vertices and the edge midpoints.  Tell them that in the structure they will build, for any pair of triangles, not only are they linked, but they meet in a special way: an inner vertex of each one touches an edge midpoint of the other.  The image above shows the red and blue triangle meeting like this.  The arrows in the image above indicate the two places where an inner vertex meets an edge midpoint.  In a sense, this is the "formula" for solving this puzzle.


8. From this point on, it is difficult to give specific instructions, so the groups should treat it as a puzzle.  Can they add a third triangle and then a fourth triangle so that for every pair (whatever two colors they pick) an inner vertex of each one touches an edge midpoint of the other. It is best to add one stick at a time, visualizing where to add a triangle, instead of making an entire triangle separately and trying to weave it in.  The image above shows a possible intermediate stage with a third triangle positioned with the inner-vertex-to-edge-midpoint connections.


9.  A correct assembly of all four triangles is shown above.  It may take a while for students to find it.  When a group does, ask them to check that every inner vertex touches some edge midpoint and every edge midpoint touches some inner vertex, i.e. no inner vertex "elbow" is hollow.

10. Students who successfully finish their construction can help other groups.

11. The final step will be to glue the joints so the clamps can be removed.  First, ask students to snug up any looseness in their model.  If any movement is possible, a clamp can be removed, the sticks that meet there can be adjusted to be closer together, and the clamp can be replaced.  Do this everywhere until all the joints are snug and there is no relative motion possible between the triangles.


12. Squirt some wood glue on a scrap of cardboard as a palette.  One at a time, remove a clamp, use a small brush to apply a thin layer of glue in the joint, and replace the clamp making sure the joint is snug.  Tell students not to apply too much; it shouldn't drip out. To keep track of what has and hasn't been glued, it is easiest to do all three joints of one color, then the three of a second color, etc.

13. Wait 20 minutes or more for the glue to dry before removing the clamps.  While the glue is drying, you can ask the class to ponder whether all the structures in the room must be the same or whether there might be more than one possible solution to the puzzle.


Part C. Conclusion

Ask students to observe the structure and discuss what they see.  This helps develop a deeper understanding and the ability to visualize it.  Some observations you might elicit are:


1. The triangles are concentric, meaning the centers of the four triangles coincide.

2. No matter which pair of the four triangles you choose, you can see they are linked like two links of a chain.

3. No matter which pair of the four triangles you choose, you can see they touch twice. An edge midpoint of each sits inside an "elbow" of the other at an inner vertex. 

4. If you choose any triangle and look at its three inner vertices, they touch edge midpoints of the other three triangles, i.e., the other three colors.  Similarly, for each triangle, the three edge midpoints touch inner vertices of the three other colored triangles.

5. You can stand it up on three vertices.  By symmetry, the three points touching the ground form an equilateral triangle.  Three colors will touch the ground and the triangle of the fourth color will be horizontal.  There are eight ways to do this because the triangle of any one of the four colors can be chosen to be horizontal and it can be flipped over if desired.

6. You can stand it up on four vertices so there is a four-way opening uppermost and lowermost.  By symmetry, the four points touching the ground form a square.  All four colors touch the ground.  No triangle is horizontal.  You can count that there are six four-way openings, so there are six ways to do this.


7. The planes of the triangles are not perpendicular.  This is clear if you rest it on three points, so one plane is horizontal and then observe that none of the other planes are vertical.  (If two planes are perpendicular and one is horizontal, the other would have to be vertical.)  You can see this angle if you sight along a line which is the intersection of two planes, as in the image above.  The angle between the green and red planes can be seen to be approximately 70.5 degrees.  It turns out that the angle between any two planes is the same as the angle between any two faces of a regular tetrahedron. 


If you have a small model of a regular tetrahedron handy, you can align it to illustrate this relationship, with each face plane of the tetrahedron parallel to one of the four triangle's planes.  See this video for an illustration of parallel relationship between the regular tetrahedron faces and the four planes of this construction.

8. There are two possible ways to link the triangles.  They are mirror images of each other.  One would expect roughly half the class to come up with one and half the class to come up with the other.  To understand the difference between the two solutions, observe that in the image above, we are looking directly at a green vertex, with a red edge near to us horizontally.  The green triangle is rotated slightly counterclockwise of vertical.  In the mirror image structure, the green plane would be slightly clockwise of vertical.  You can look at your structure in a mirror to see what the other version would look like or look around the classroom to see if some students have built the other version.


9. Imagine that for each of the eight ways of resting it on three points we attach a paper equilateral triangle that stretches between the three vertices that touch the ground.  Also, for each of the six ways of resting it on four points, attach a square that stretches between the four contact points.  The structure would be completely covered by the six squares and eight triangles.  So it fits snugly inside a cuboctahedron, the polyhedron shown above.  Our structure has the same vertices (the same positions of points in space) as a cuboctahedron.  Another way to think of this is that if you put the structure inside a big balloon and let the balloon shrink until it snugly surrounds the outermost vertices of the structure, the balloon would have a cuboctahedron shape.  (Mathematicians call this the "convex hull" of a shape.)


10. You can show this video, which shows how the structure fits inside a cuboctahedron.

11. Recall there are eight ways to rest it on three points.  If you choose any three of the four colors and list them in any order you choose, e.g., green, yellow, blue, there is always exactly one way to turn it so the three contact points, when listed in clockwise order, match your choice of colors.  For example, the image at the top of this page shows a model positioned so it contacts the table with blue, red, green points, in clockwise order.  This observation can be used as an introduction to combinatorics to expose students to exciting branches of mathematics they may not otherwise see in the curriculum.

12. Recall there are six ways to rest it on four points.  If you list all four colors in any order, there is always exactly one way to rest it on four points so those points are colored in that clockwise order.

 
Possible Extensions

1. Make the mirror-image version of the one you first made.

2. Make a giant version from cardboard, thin wood, or other suitable material.

3. High school students should be able to prove that for a snug fit (assuming the planes are of zero thickness) the inner triangle holes must be exactly half the size of the outer triangles.  From this, they can show the ideal length-to-width ratio of the sticks should be 4·sqrt[3], roughly 6.9282.  Given the thickness and imperfections of the wood, 7 is a reasonable approximation.